Friday, August 30, 2013

Donors Choose

Do you DC?

Donors Choose projects have made such a huge difference in my classroom!  They have provided my students with some DESPERATELY needed materials.  I've completed 3 projects this past year, with the help of so many friends, the families of former students and of course my very own family!

I wish I had the words to express how thankful I am for the games, activities, books and materials that now fill my classroom.

I received the materials from my latest project in the mail this week.  There were a variety of materials for students to investigate as they master our measurement and geometry standards as well as some new books to be used during the lessons.

My Math Coach stopped by this morning to check everything out and we were talking the huge deficit of materials that ALL of the teachers on my grade-level face when it comes to math, geometry in particular.

The same could be said for my whole school and probably yours as well.

Teaching without the tools you need is equivalent to landing on the moon without a rocket.  The proper tools can transport your students to mastery...or the moon ;).

If you're asked to transport your students to the moon each year without a rocket, you should seriously consider creating a Donors Choose account!


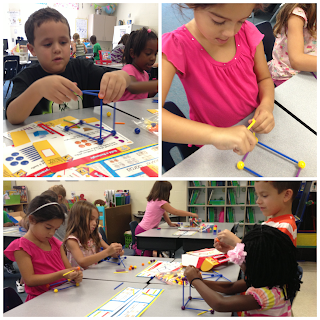
Most of the materials we received won't be used until the second half of the school year when we begin working on the standards they are intended to support so today we spent a little time checking everything out.  Building the shapes (above) was a big favorite!  Look how engaged they are.  They wouldn't even be that interested if I lit myself on fire and rode around the classroom on the back of a tiger!


If you've never set up a Donors Choose project here's how:

1.  Go to http://www.donorschoose.org/teachers

2.  Register for an account and start setting up (shopping for) a project.

3.  Allow DC for post on your Facebook.

I didn't want to do number 3 because I felt weird about asking my friends and family to contribute.  The flip side of that thinking is that NO ONE WILL KNOW about your project.  When you put the word out you provide the people who care about you most (and know how hard you work) with the option to contribute!  You'll be surprised by the generosity of your friends and family!

The final 2 tips are:

4.  Lately DC has been providing a match code during the first week of your project.  They will match any donation (up to $75) made during that week as long as the donor enters the code at check out.  Post about your project EVERYDAY during this time.  Make sure EVERYONE knows the code!  You can usually get your whole project funded during that week, in fact, I've gotten a project funded in 6 hours thanks to that match code!

5.  ALWAYS donate to your own project!  I donate $25 the day it goes "live" and match it to knock $50 off the top immediately.  If you believe (& invest) in your project so will others!

If anyone else out there has DC tips please share them!  I know we all need ALL the help we can get!

Wednesday, August 21, 2013

Peek In My Room: Virtual Tour


Hey everyone!  I wanted to give you a little sneaky peek into my classroom.  I will let the pictures and videos speak for themselves.  Please enjoy!

I finally found the panorama option on my iPhone...awesome!


This year I decided to add hanging table numbers and more paper lanterns.  Because, why not?


Next you will see my whiteboard, calendar, and birthday board set up:


Video clip of our beginning of the year calendar elements:


Video of the Common Board Configuration:


I painted these new months-of-the-year hanging plaques this summer.  I've been wanting to spruce up my calendar for a while and these guys did the trick.  I'm going to attach popsicle sticks or clothes pins with each students birthday to the corresponding month once everything is settled!


Video clip of our birthday board and routines:


Now we'll move into specific area's of the room.


Above you will see a picture of my classroom library and below you'll find a video clip:


This is my Word Wall corner.  Below it is the Writing Station.  The following video clip will provide a few more details.


Up next is the listening center!


Finally, I wanted to share a few pictures and videos of some handmade items in my classroom!

Behavior chart:


Classroom helpers/jobs chart:


How we go home:


Last, but not least, C3B4me!  Best invention ever.  This is a reminder that students need to ask 3 people before they interrupt your reading groups, testing, RTI, whatever time to ask you to repeat instructions (that you probably gave 3 times already).  I love that it helps my students develop a sense of personal responsibility to begin solving their problems independently!


I hope you enjoyed this interactive tour!  Let me know what you think.  All questions and suggestions are welcome!

Monday, August 19, 2013

Back to School Ice Breaker

How do you break the ice on the first day?  Last year I used this little "ice breaker" game and it was a fun way to make new friends!


Since I thew it together last minute last year I never really did anything with it.  This year I decided to throw a dress on it share on TPT!


Students will work in small groups of 2-4 students. They will take turns rolling a die and moving a plastic bear manipulative the number of spots they rolled. 

If they land on a picture they find it on the Question Key, read it, answer it, and ask their partners to answer as well! If they land on a "you choose" arrow they can share any fact they would like about themselves. 

When all players make it to the finish line they can find new partners and play again!

What I love most about this game is that it's "print and play" friendly!  Last week I printed 10 copies of the game board and 1 copy of the question key (I projected it onto the board).  I laminated everything for durability this weekend.  Today I added 1 die and plastic bear manipulatives.  Voila!  Done!  Just what I need during Back-to-School CRAZY!

Oh, the kids had a blast too!  I'd post pictures but I totally forgot my camera today!  Looks like my students will be taking "Second Day of First Grade" pictures tomorrow!  

Womp!  Womp!

Sunday, August 11, 2013

Monday Made It: Crate Seating

Ok, I know I'm 5 years behind everyone else on this trend but I finally made some crate seating!  I've been wanting to switch from "decorating my classroom to fit a new theme every year" to "decorating my classroom with things I like since I spend more time there than in my own home."

Anyone else out there with me on this one?!?

At the end of the school year I "discovered" Hobby Lobby and their fabulous array of fabric (sorry Joann).  I chose 3, crossed my fingers and hoped it would all work out!

I've covered 2 bulletin boards and made a pillow with the yellow chevron.  I'm using the teal chevron and floral in new window valances and as covering for the crate seating.

Here's my process (and the places I found everything) for the crate seating:

1.  Purchase the following supplies:  crates (Walmart $3), foam pads-4 pack (Walmart $5), fabric-1 yard will give you enough fabric for at least 2 crates (Hobby Lobby $6), staple gun-I opted for the Stanley Sharp Shooter Light Duty Staple Gun (Target $9), staples-obviously (Target $3-$4), and sand paper (Dollar Tree $1).

The reviews for the staple gun I recommended were terrible but it worked wonderfully for me.  It's smaller than the others but that was perfect for my tiny, delicate lady hands.  Save yourself a headache and make sure you buy light duty staples to use in the gun (all the info you need is on the package).

2.  Roll up to the Home Depot with one of your crates in tow (no shame).  I explained what I wanted to do and that the crate would need to hold between 40-80 lbs.  He helped me choose a sturdy wood about 1/2 inch thick.  He measured ridge above where the file folders would hang (if you were using it for that) and then he cut the wood down to size.

3.  Square block, round hole.  The corners of your board will come to a point while the corners in your crate are rounded.  You could probably ask the Home Depot to slice off a bit of your corner but I wanted a snug fit (no seat bottoms falling through and smashing everything inside), so I hand sanded the corners down until the board fit easily but still snuggly.

4.  Trace the rounded wooden rectangle on one of your foam pads and cut it out.  I cut out a second foam pad about an inch smaller all the way around for extra padding.


5.  Lay your fabric out flat then add the foam and wooden board.  Wrap the fabric around the board and trim extra fabric.

6.  Staple the fabric to the board.  Make sure to wrap tightly.


7.  Fold and staple ribbon to the bottom to make the seat easier to remove.  I added a staple along the side to keep it from slipping under the board.


This is my finished product!


Tuesday, August 6, 2013

Sight Word Baseball

Do you ever get a little carried away transforming your classroom into a camp ground, cave, beach, or train for special thematic day?

I like to turn mine into a baseball diamond once a week and play ball!  Sight Word Baseball to be specific!  I have always used index cards to play but decided I needed to "jazz" it up this summer.

We play a few different versions of baseball to keep it fresh and separating these words into 5 games will definitely help me differentiate a little more.  I use this game as a whole group and small group activity. You will find several resources in this pack that will help you facilitate both whole group and small group versions.  There are instructions for each, a color-coded poster for students to reference, a baseball diamond game-board, and a score sheet as well as 500 color-coded words printed on baseballs.

For the first quarter we will play ball with the 1st 100 Fry words as a whole class during Skills Block.  Usually I keep the class together and I rotate through all students once or twice.  Sometimes I mix it up and we play on teams or I change up how students move around the bases.  Obviously this is a walking game (unless you like to get a little crazy and let 6 year olds run laps around your classroom, I'm not judging...yes I am).  My top 3 favorite movement variations (in order of most to least) are: 1) dancing, also known as shaking your tail-feather  2) any animal inspired movement, particularly slithering like a snake or doing the worm and 3) dancing, did I mention dancing.  Seriously, what's better than kids dancing?  I wish I had that much fun doing...well, anything :)

Freebie available in Preview
During the second quarter I will transition to the 2nd 100 Fry words as a whole group game and put the 1st 100 words into literacy centers for students to continue practicing words with their partners.  There is a score sheet for students to keep track of the score (for those competitive kids).  When I play as a whole group I don't worry with the score.

I plan on using the 4th and 5th hundred as a small group enrichment activity for my students performing above grade-level.  As the year goes on you'll be able to use the words you've already played as a whole class in remediation activities with students who may not have memorized the words yet.


Earlier I mentioned that I like to keep students in a whole group and rotate through them once or twice during a Skills Block lesson.  The words are color coded to indicate the number of bases the student can move to if they read the word correctly.  Green words are worth 1 base.  Blue words are worth 2 bases.  Yellow words are worth 3 bases.  Red words are a home run!  So if a student reads a blue word correctly they move to 2nd base.  If the next person reads a green word correctly they move to first base and the previous player moves to 3rd base.  If the 3rd player reads a red word correctly they get a home run and everyone scores!

What happens when they read a word incorrectly?  I always "pitch" them 2 more words (3 strikes, you know).  Most of the time a student can get on base with 3 chances.  Occasionally it doesn't happen and you're left with a choice:  walk them or strike them out?  Totally your decision, some kids can deal with a strike out and some can't.  This is supposed to be fun and you don't want them to disengage so keep that in mind as you decide how you will play with your class!

Here's one of the best parts of Sight Word Baseball....the bases!  I found this sweet treasure at the Dollar Tree!  After 4 years of use my old bases were pretty worn so I picked up a brand new set.  I can't wait to tape them down!

Students playing in a small group will need the baseball diamond game-board, plastic bears or place markers, a set of 100 baseballs.  The score sheet and poster for referencing are optional.  Each student will take a turn flipping over 1 baseball and reading it.  If they read it correctly they move the number of spaces indicated by the color of the word and keep the baseball.  If they read it incorrectly they place it in a discard pile.  The next student then takes their turn.  It is up to the students playing the game to keep each other accountable.  I encourage this by telling them that if they catch their partner reading a word wrong they should help correct them and make sure they discard because the objective is to have the most baseballs by the end of the game.  Keeping their partner accountable could help them win the game.

Sight Word Baseball is available in my TPT store and this Score Sheet (pictured above) is a little freebie that you can get in the preview!

Pick up your copy today and play ball all year long!